VitePress 搭建博客系统指南
由于大环境不好,被 N+1 了,上班的路上还想着如何优化解决开发中遇到的痛点,开了一个早会,然后公司解散了,又要重新开始找工作了。由于之前工作比较忙,一直没有时间学习,趁着空档期好好的学习一波,顺便迁移一下自己的博客,老博客是 3 年前用 hexo 做的,最近看 vitePress 比较火,VitePress 是由 Vue 团队开发的轻量级静态站点生成器,专注于为文档和博客提供支持。它基于 Vite 和 Vue 3,具有快速构建速度和简单的配置特性,主题简洁明了易上手,所以就选用 vitePress 来搭建此次的博客系统。
一、前置要求
在开始之前,请确保你的环境满足以下要求:
- Node.js 版本 >= 16.x
- pnpm 或 Yarn, npm 包管理工具,推荐使用
pnpm
二、初始化
1. 创建项目目录
首先,选择一个合适的位置创建你的项目目录,以pnpm 为例,初始化 package.json
$ mkdir vitepress-blog && cd vitepress-blog && pnpm init2. 安装 VitePress 生成项目
利用下面命令安装vitePress, 安装完成后,利用 VitePress 附带一个命令行设置向导,帮助我们快速构建一个基本项目。
$ pnpm add -D vitepress
#通过运行以下命令启动向导
$ pnpm vitepress init$ npm add -D vitepress
#通过运行以下命令启动向导
$ npx vitepress init$ yarn add -D vitepress
#通过运行以下命令启动向导
$ yarn vitepress init配置我们需要的选项:
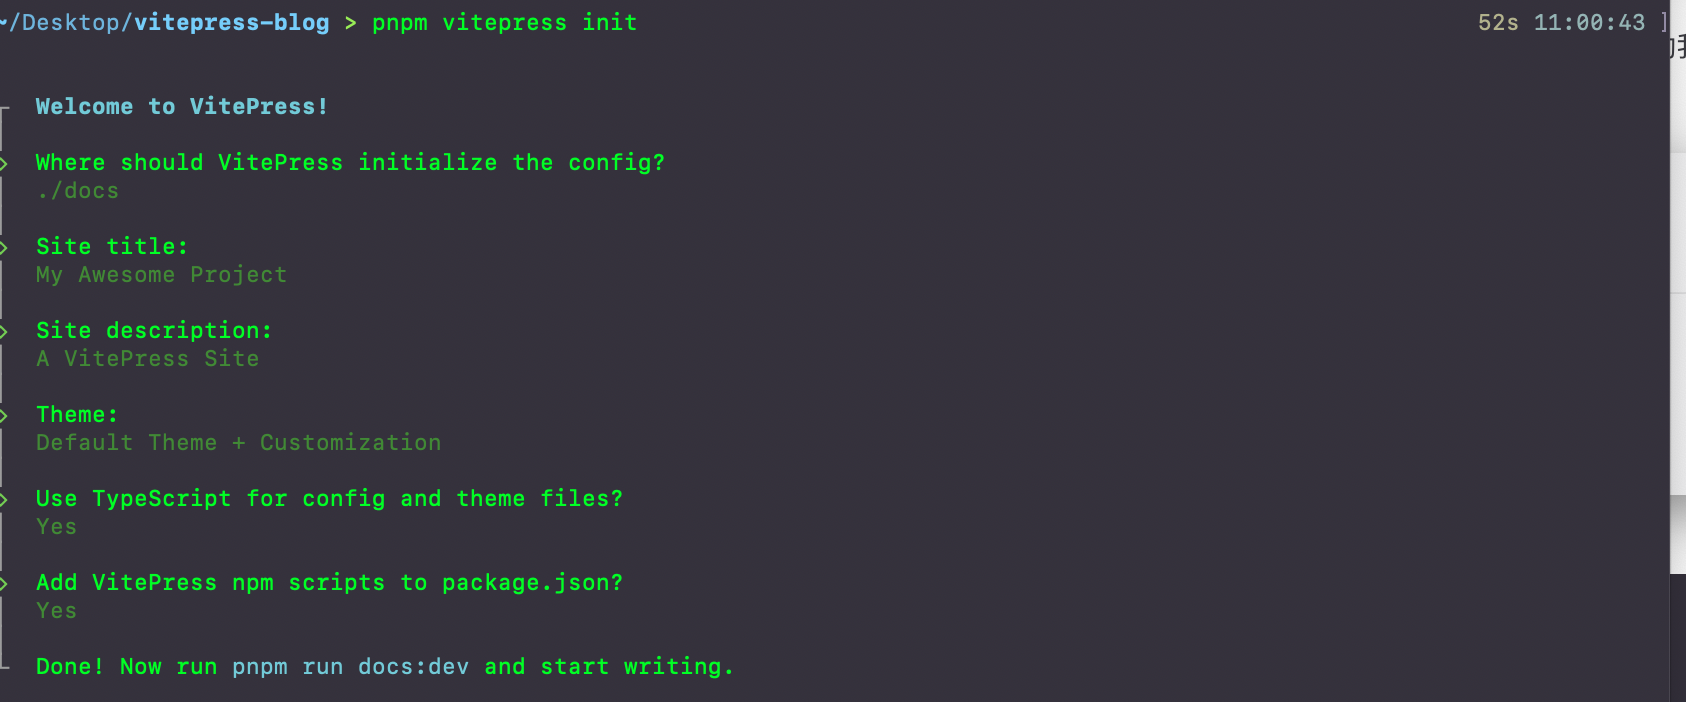
如果正在构建一个独立的 VitePress 站点,可以在当前目录 (./) 中搭建站点。但是,如果在现有项目中与其他源代码一起安装 VitePress,建议将站点搭建在嵌套目录 (例如 ./docs) 中,以便它与项目的其余部分分开。
假设选择在 ./docs 中搭建 VitePress 项目,生成的文件结构应该是这样的:
.
├── docs
│   ├── .vitepress
│   │   ├── config.mts
│   │   └── theme
│   │       ├── index.ts
│   │       └── style.css
│   ├── api-examples.md
│   ├── index.md
│   └── markdown-examples.md
├── node_modules
├── package.json
└── pnpm-lock.yaml
三、修改项目默认配置
1. 修改构建命令
打开package.json, 修改scripts下的命令,方便开发。添加"type:":"module"避免后面安装插件报错。
WARNING
在 package.json 文件中,添加 "type": "module" 是为了告诉 Node.js 使用 ECMAScript Modules (ESM) 语法来处理 .js 文件,而不是使用 CommonJS 模块系统
{
  "name": "vitepress-blog",
  "version": "1.0.0",
  "description": "",
  "main": "index.js",
  "type":"module",
  "scripts": {
    "dev": "vitepress dev docs",
    "build": "vitepress build docs",
    "preview": "vitepress preview docs"
  },
  "keywords": [],
  "author": "",
  "license": "ISC",
  "dependencies": {
    "vitepress": "^1.3.4",
    "vue": "^3.4.38"
  }
}
2. 修改 vitePress 配置
打开docs/.vitepress/config.mts文件,添加如下配置,在/docs下创建public目录,用来存放静态资源,如网站的favicon.ico。在themeConfig的search字段设置搜索框配置,这里使用local, 可以使用algolia,其他配置参见siteConfig 和 themeConfig
import { defineConfig } from "vitepress";
export default defineConfig({
title: "My Awesome Project",
description: "A VitePress Site",
// header标签里面插入的内容
head: [["link", { rel: "icon", href: "/favicon.ico" }]],
themeConfig: {
// 网站的logo
logo: "/logo.svg",
// 文章右侧大纲目录
outline: {
level: [2, 6],
label: "目录",
},
//自定义上下页名
docFooter: {
prev: "上一页",
next: "下一页",
},
3. 修改 vitePress 默认的主题样式
打开.vitepress/theme/style.css 文件,修改主题的颜色,如果想找配色可以去这个www.eggradients.com网站查找配色,然后替换style.cs 里面的颜色变量,例如下面一份简单的颜色配置:
:root {
  --vp-c-brand-1: #5e3af2;
  --vp-c-brand-2: #694aea;
  --vp-c-brand-3: #7759f1;
}

.dark {
  --vp-c-brand-1: #9b85f5;
  --vp-c-brand-2: #7759f1;
  --vp-c-brand-3: #615ced;
}

:root {
  /* hero标题渐变色 */
  --vp-home-hero-name-color: transparent;
  --vp-home-hero-name-background: -webkit-linear-gradient(
    120deg,
    #5e3af2,
    #00f6c0
  );

  /*hero logo背景渐变色 */
  --vp-home-hero-image-background-image: linear-gradient(
    -45deg,
    #5f3af2c8 50%,
    #47cbff7e 50%
  );
  --vp-home-hero-image-filter: blur(76px);
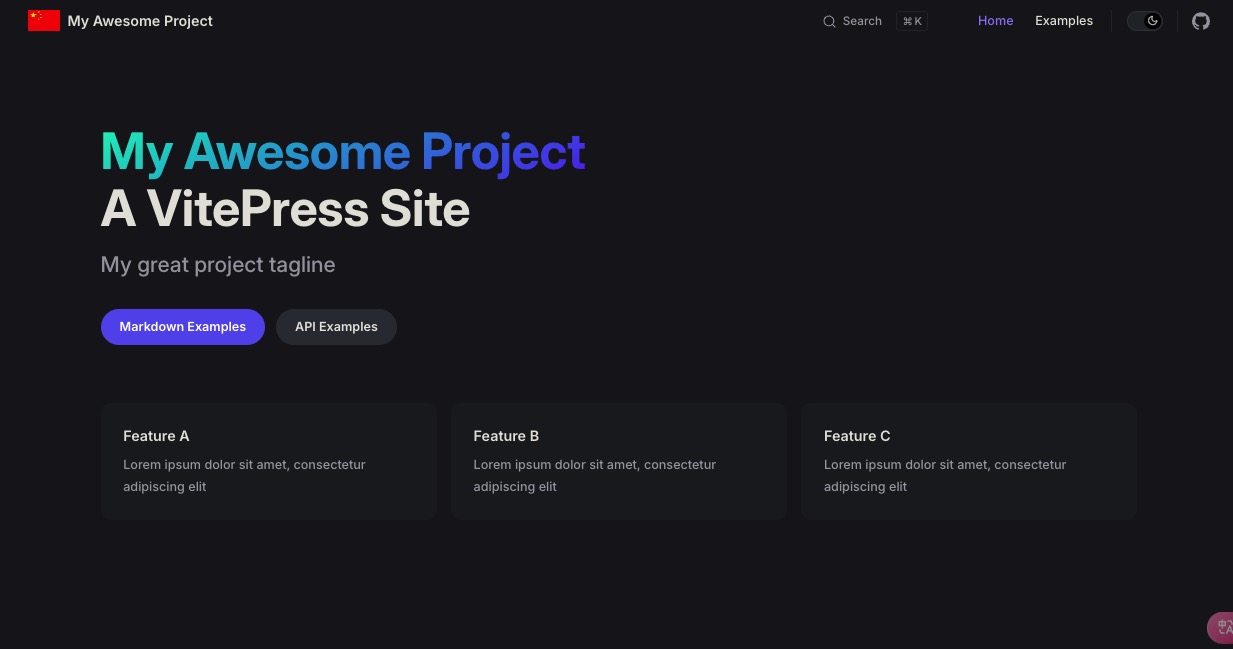
}运行pnpm run dev,打开浏览器,发现默认的颜色主题已经更改了
4. 修改首页
修改/docs/index.md 文件,修改首页展示的内容,总体分为三层layout,hero,features
layout首页的布局,首页默认是homehero首页上方的展示区域配置features首页下方区域的卡片配置
这里我提供一份简单的配置:
对应的图片需要自己放到
public目录下
---
layout: home

hero:
  name: "China Carlos's Blog"
  text: "PWA FAST SDK"
  tagline: Carlos's Blog Web Site
  image:
    src: /pwa.svg
    alt: VitePress
  actions:
    - theme: brand
      text: FAST PWA SDK API
      link: https://carlosme.fun
    - theme: alt
      text: PWA 应用案例
      link: https://carlosme.fun
    - theme: alt
      text: 我的博客
      link: https://carlosme.fun
    - theme: alt
      text: 前端面经
      link: https://carlosme.fun
    - theme: alt
      text: 支持一下
      link: https://carlosme.fun

features:
  - title: 什么是PWA渐进式应用?
    icon:
      src: /light_pwa.svg
    details: PWA(Progressive Web Application,渐进式 Web 应用)是一种结合了传统 Web 应用与原生移动应用优势的应用程序。PWA 利用现代 Web 技术提供用户体验接近原生应用的 Web 应用
    link: https://carlosme.fun
    linkText: 查看详情
  - title: PWA 是如何构建的?
    icon:
      src: /config.svg
    details: 构建一个 PWA(渐进式 Web 应用)涉及多个关键技术和步骤,以确保应用具备离线能力、快速加载、可安装性等核心特性。以下是构建 PWA 的主要步骤和技术。
    link: https://carlosme.fun
    linkText: 查看详情
  - title: PWA 应用的优势有哪些?
    icon:
      src: /lightning.svg
    details: PWA 结合了 Web 应用的普遍可用性和原生应用的用户体验,是一种低成本、高效能的跨平台应用开发解决方案,通过提供离线能力、推送通知、可安装性等特性,能够在保持用户体验的同时,降低开发、维护和分发成本。
    link: https://carlosme.fun
    linkText: 查看详情
  - title: 如何快速开发一个PWA应用?
    icon:
      src: /terminal.svg
    details: 要快速开发一个 PWA 应用,可以遵循以下步骤。这些步骤涵盖了从设置基础项目到实现 PWA 核心特性的所有内容。
    link: https://carlosme.fun
    linkText: 查看详情
  - title: PWA 的使用场景有哪些?
    icon:
      src: /mode.svg
    details: PWA 的应用场景非常广泛,其核心优势包括离线支持、跨平台兼容、安装便捷性等,使其适用于各种类型的应用和服务。无论是商业、教育、医疗还是娱乐领域,PWA 都能够提供流畅、高效和可靠的用户体验。
    link: https://carlosme.fun
    linkText: 查看详情
  - title: PWA 周边生态
    icon:
      src: /earth.svg
    details: PWA(渐进式Web应用)生态包括Service Workers、Web App Manifest、响应式设计、离线支持、推送通知和应用缓存等技术,旨在提升Web应用的性能和用户体验,接近原生应用的功能。
    link: https://carlosme.fun
    linkText: 查看详情
---
此时首页的内容发生了更改:如下图所示: 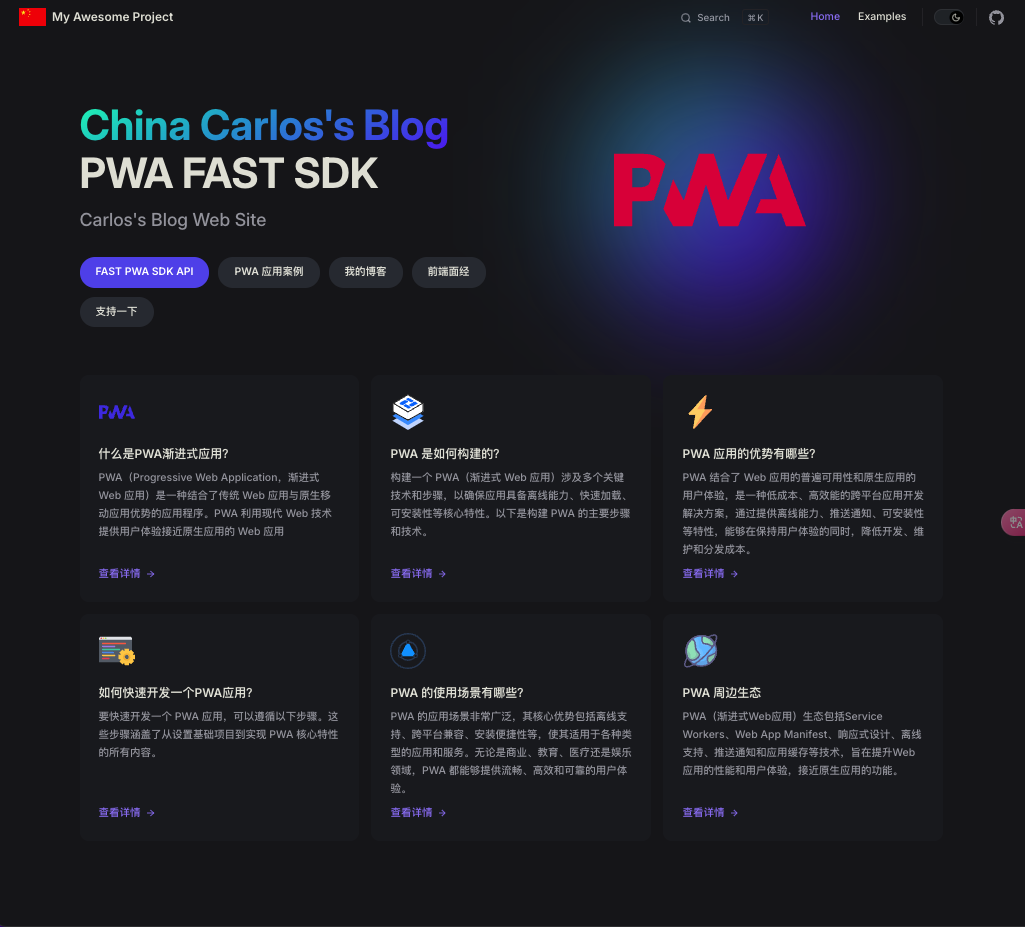
四、打包部署
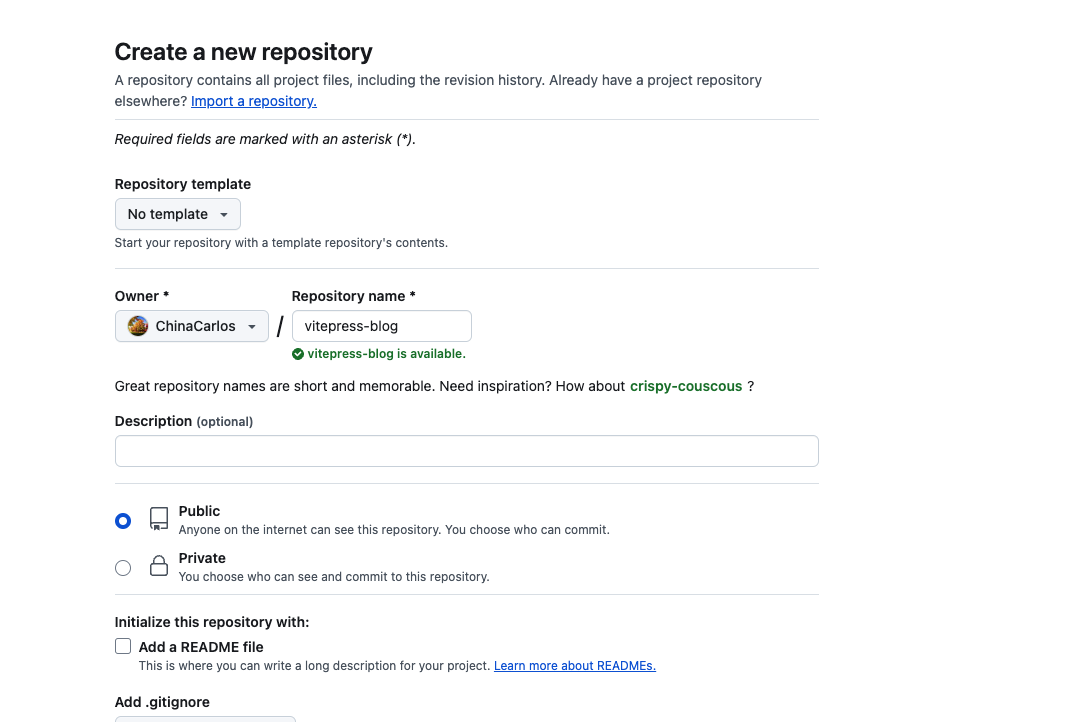
1. 在 github 中创建一个名称为vitepress-blog的仓库,当然仓库的名字可以自定义
2. 在项目中初始化 git
$ git init3. 根目录添加.gitignore 文件
忽略一下不需要提交到 github 的文件以及目录
node_modules
dist
cache
.temp
.DS_Store
4. 上传代码
git branch -M main
git add .
git commit -m "init project"
# 关联远程仓库 git@github.com:userName/repositoryName.git 这里是你自己的仓库地址
git remote add origin git@github.com:userName/repositoryName.git
git push -u origin main
5. 通过 github actions 部署到 github pages
TIP
基本都使用 github pages 来部署博客系统,使用 github pages 有两种方式,一种是通过分支部署,通常要写一个deploy.sh,在提交代码之后执行该脚本,将打包之后的产物放到另一个分支上,通过 github pages Deploy from a branch 方式部署,另一种通过github actions来部署。这里展示利用github actions 来部署,更加快捷,每次提交完代码自动构建部署。
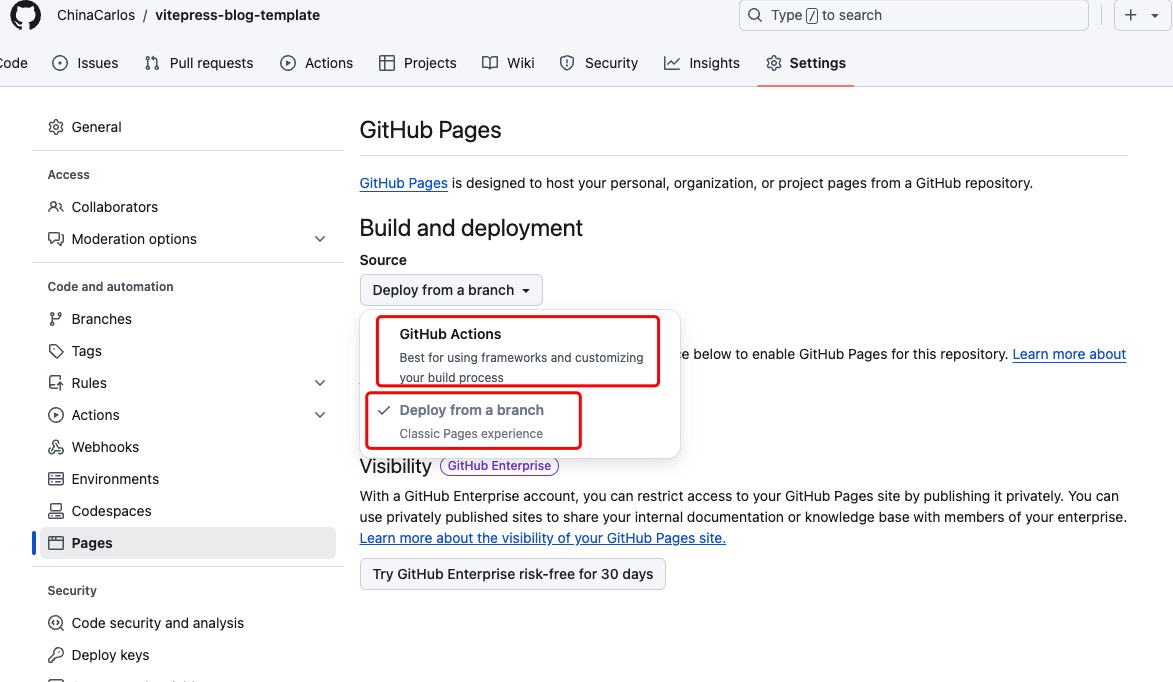
如上图所示,我们在 githubvitepress-blog仓库的Settings里面,找到Pages, 部署方式选择Github Actions,下面编写 github 的workflows。
执行下面命令创建.github/workflows 目录 和生成该目录下的deploy.yml 文件
$ mkdir .github
$ mkdir .github/workflows/
$ touch .github/workflows/deploy.yml修改deploy.yml文件,内容如下:
# 构建 VitePress 站点并将其部署到 GitHub Pages 的示例工作流程
name: Deploy VitePress site to Pages

on:
  # 在针对 `main` 分支的推送上运行
  # 如果是使用 `master` 分支作为默认分支,请将其更改为 `master`
  push:
    branches: [main]

  # 允许你从 Actions 选项卡手动运行此工作流程
  workflow_dispatch:

# 设置 GITHUB_TOKEN 的权限,以允许部署到 GitHub Pages
permissions:
  contents: read
  pages: write
  id-token: write

# 只允许同时进行一次部署,跳过正在运行和最新队列之间的运行队列
# 但是,不要取消正在进行的运行,因为我们希望允许这些生产部署完成
concurrency:
  group: pages
  cancel-in-progress: false

jobs:
  # 构建工作
  build:
    runs-on: ubuntu-latest
    steps:
      - name: Checkout
        uses: actions/checkout@v4
        with:
          fetch-depth: 0 # 如果未启用 lastUpdated,则不需要
      - uses: pnpm/action-setup@v3 # 使用 pnpm
      - name: Setup Node
        uses: actions/setup-node@v4
        with:
          node-version: 20
          cache: pnpm # 缓存设置为 pnpm
          version: 8.14.0 # 您可以根据需要指定特定的 pnpm 版本
      - name: Setup Pages
        uses: actions/configure-pages@v4
      - name: Install dependencies
        run: pnpm install # 使用 pnpm 安装依赖
      - name: Build with VitePress
        run: pnpm run build # 使用 pnpm 运行构建
      - name: Upload artifact
        uses: actions/upload-pages-artifact@v3
        with:
          path: docs/.vitepress/dist # 打包之后产物的文件夹

  # 部署工作
  deploy:
    environment:
      name: github-pages
      url: ${{ steps.deployment.outputs.page_url }}
    needs: build
    runs-on: ubuntu-latest
    name: Deploy
    steps:
      - name: Deploy to GitHub Pages
        id: deployment
        uses: actions/deploy-pages@v4
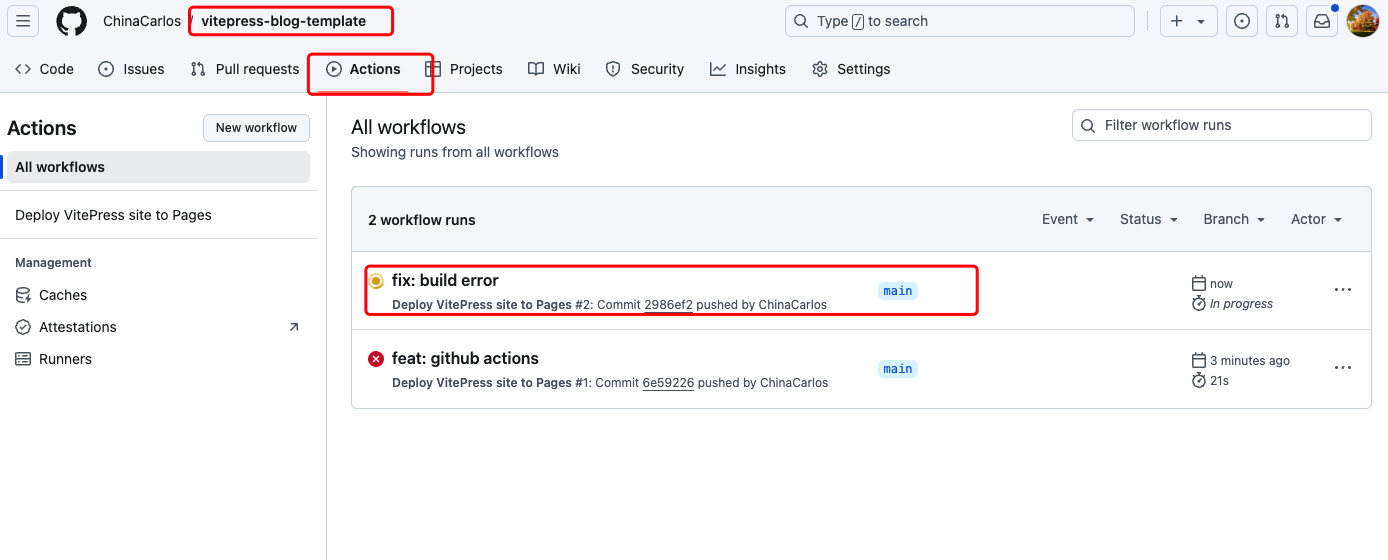
然后提交代码到 github,此时就会自动触发 github actions
DANGER
github actions 如果报错:Error: No pnpm version is specified. Please specify it by one of the following ways
请在package.json中添加 "packageManager": "pnpm@8.14.0"
Github Actions 位置:
Github Actions 构建部署:
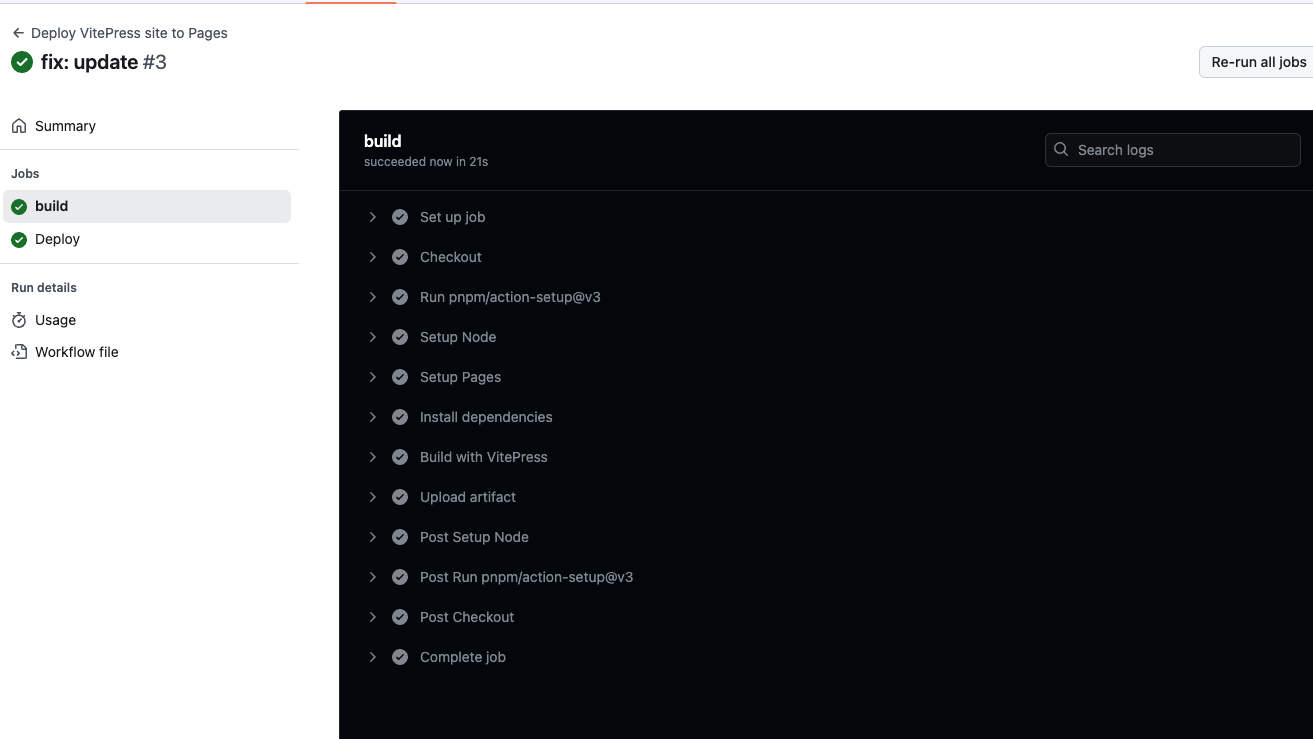
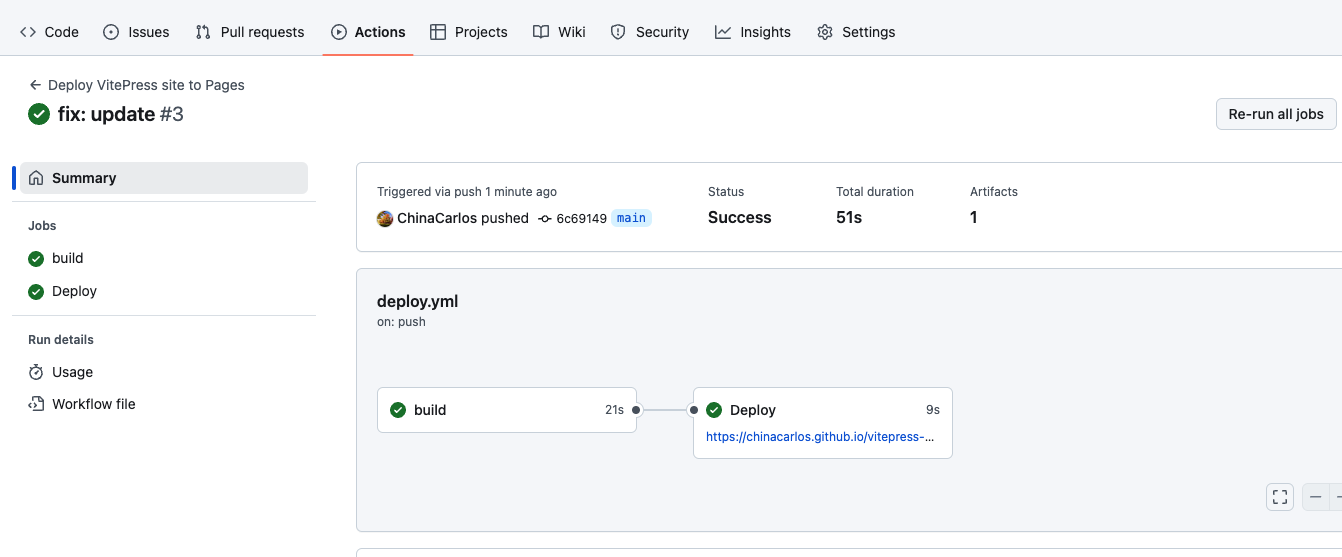
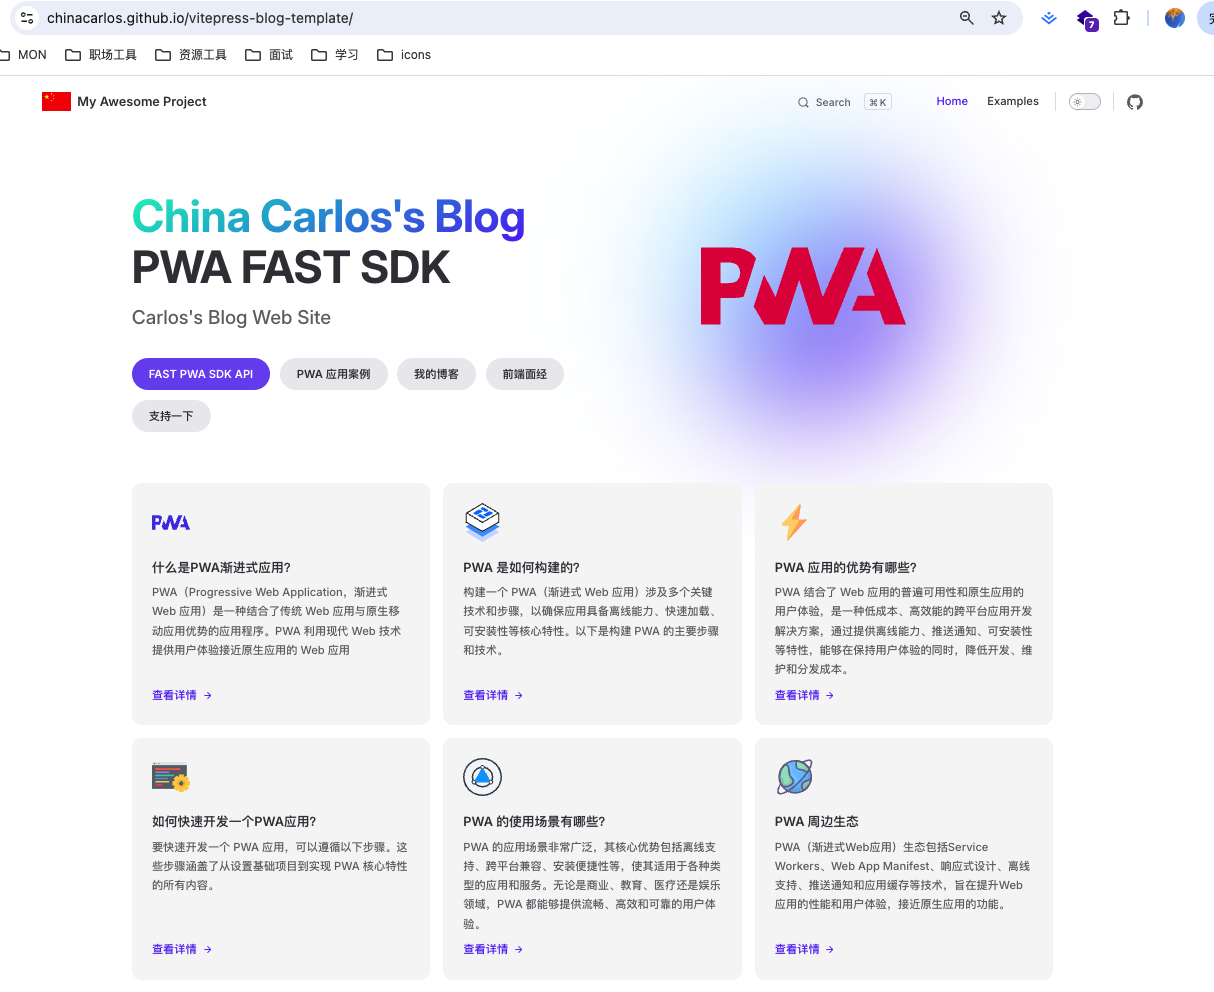
Github Actions 部署完成之后,访问 Github Pages 的链接,即可访问博客系统:
例如: https://chinacarlos.github.io/vitepress-blog-template/
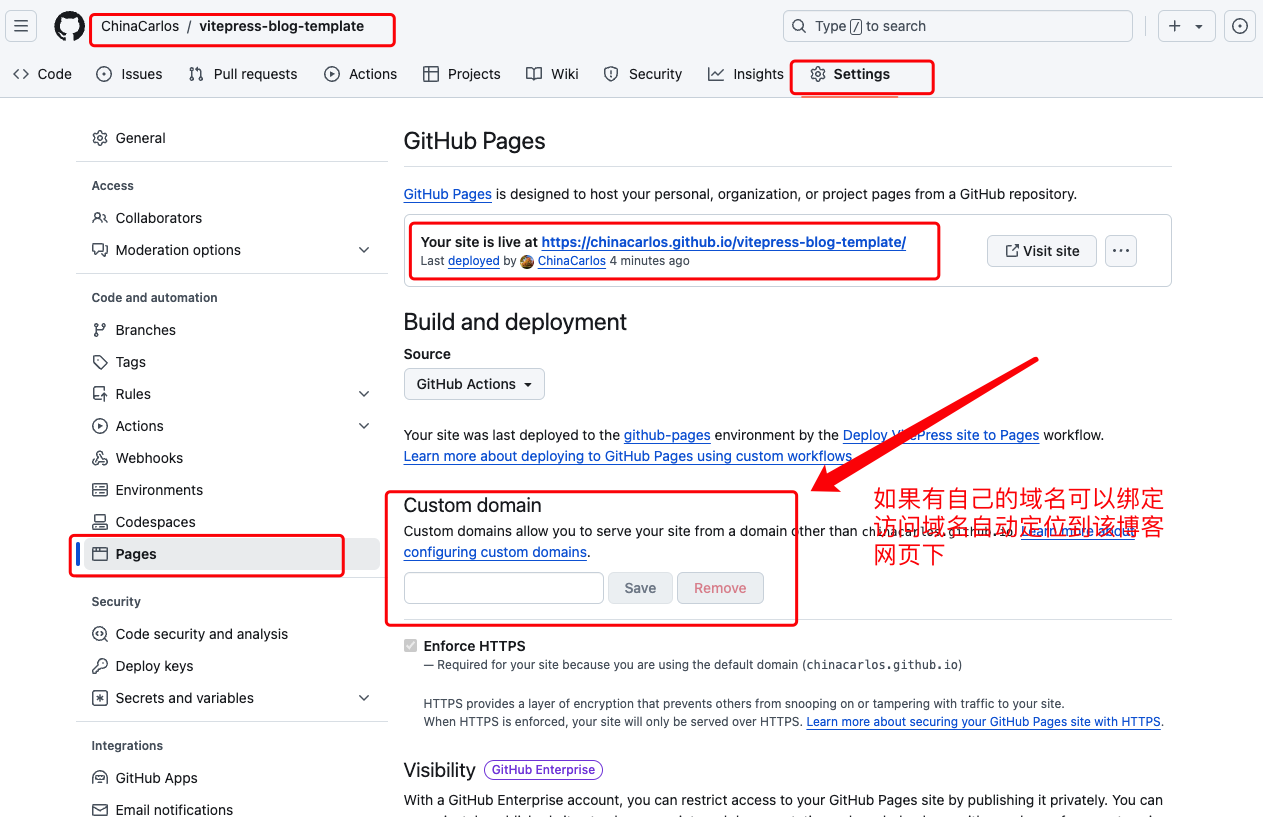
如果有自己的博客域名,可以将博客域名绑定到Custom domain 下,绑定之后,访问该域名会自动跳转定位到该博客系统
WARNING
如果发现博客的样式丢失,此时要检查
docs/.vitepress/config.mts文件夹下的base设置是否正确。如果使用 Github Pages 自己的链接访问如:
https://chinacarlos.github.io/vitepress-blog-template/base需要设置成/vitepress-blog-template/也就是自己的博客仓库名称如果自己绑定了自己的博客域名如
https://carlosme.fun,base需要设置为/
至此,我们博客整体框架已经完成了,接下就是美化以及丰富博客的功能模块了 🎉🎉🎉
五、美化主题
1. 更改搜索框的位置,修改代码块,给导航栏添加毛玻璃等效果,如下图:
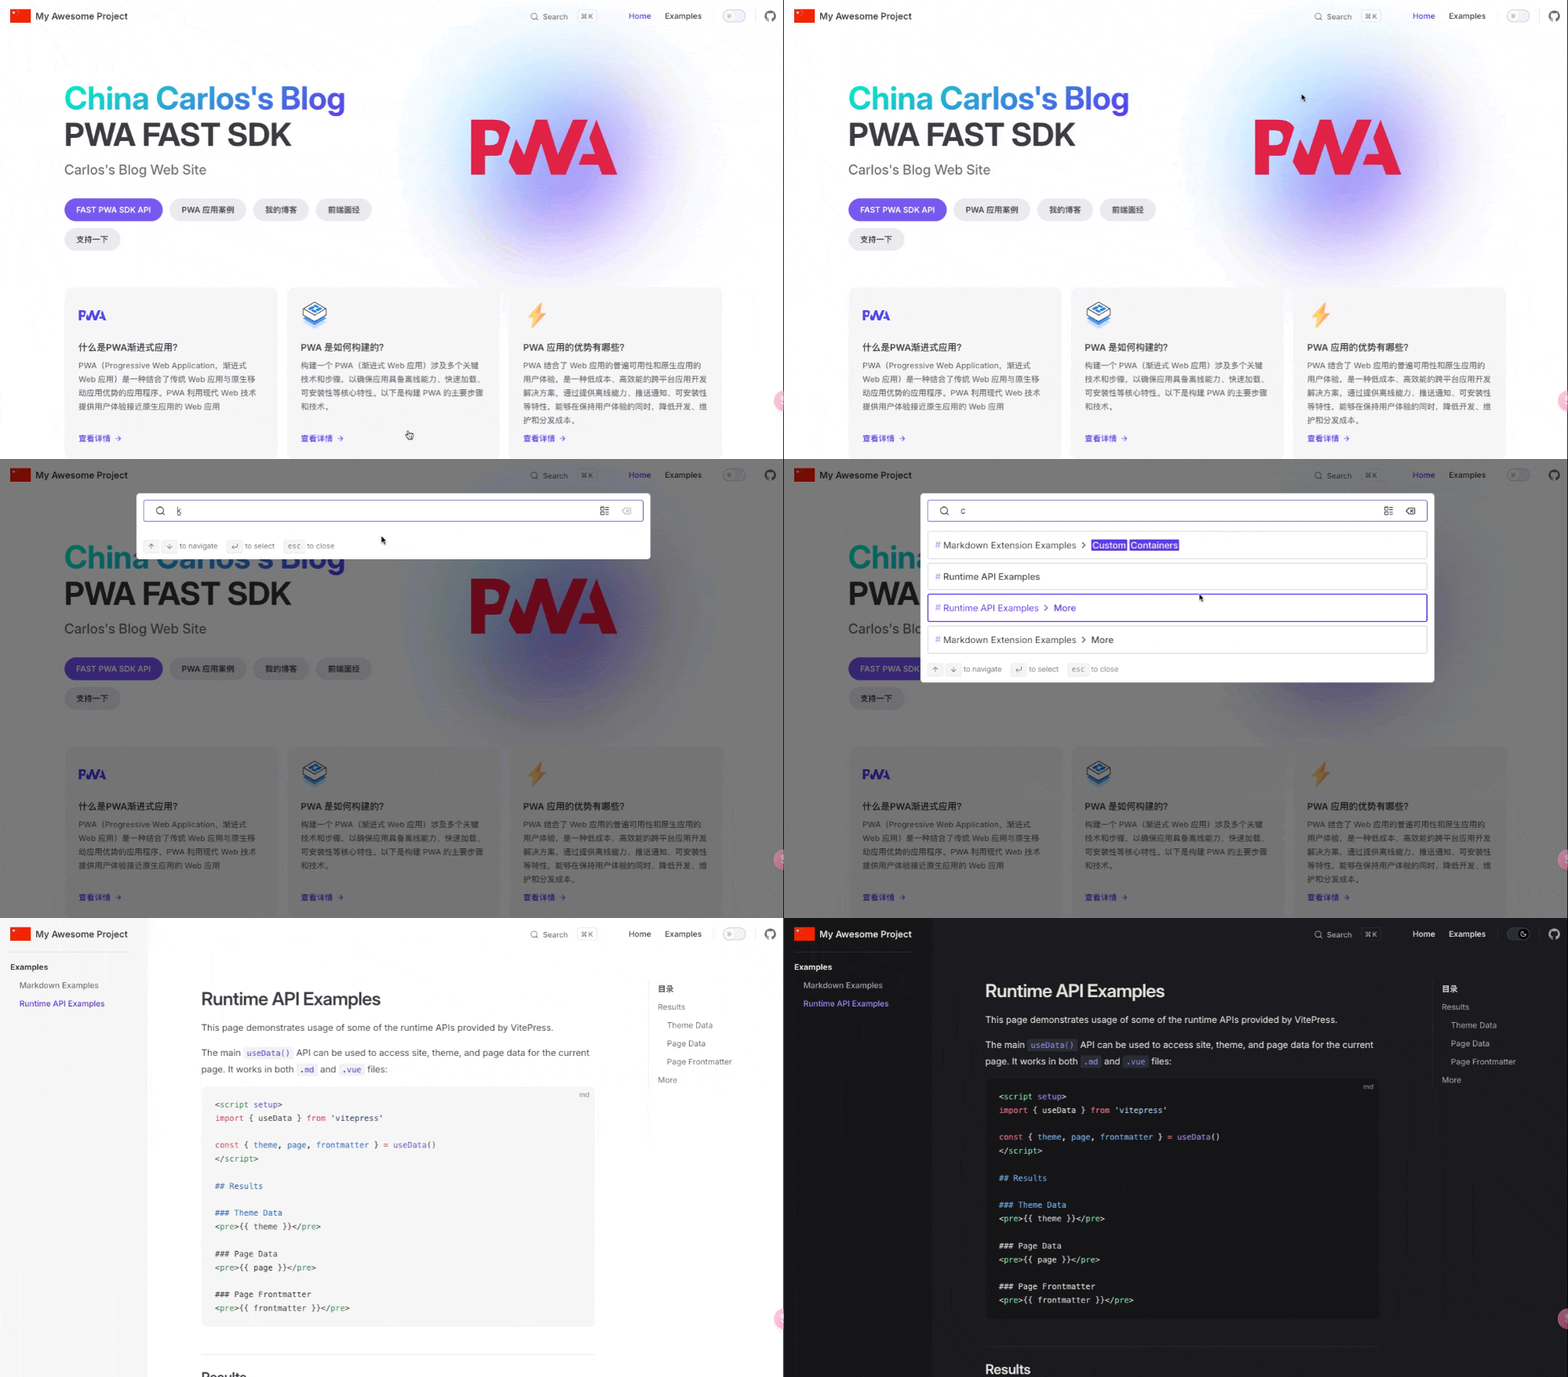
修改.vitepress/theme/style.css文件:
:root {
  --vp-c-brand-1: #5e3af2;
  --vp-c-brand-2: #694aea;
  --vp-c-brand-3: #7759f1;

  --vp-custom-block-info: #cccccc;
  --vp-custom-block-info-bg: #fdfdfe;

  --vp-custom-block-tip: #009400;
  --vp-custom-block-tip-bg: #e6f6e6;

  --vp-custom-block-warning: #e6a700;
  --vp-custom-block-warning-bg: #fff8e6;

  --vp-custom-block-danger: #e13238;
  --vp-custom-block-danger-bg: #ffebec;

  --vp-custom-block-note: #4cb3d4;
  --vp-custom-block-note-bg: #eef9fd;

  --vp-custom-block-important: #a371f7;
  --vp-custom-block-important-bg: #f4eefe;
  /* hero标题渐变色 */
  --vp-home-hero-name-color: transparent;
  --vp-home-hero-name-background: -webkit-linear-gradient(
    120deg,
    #5e3af2,
    #00f6c0
  );

  /*hero logo背景渐变色 */
  --vp-home-hero-image-background-image: linear-gradient(
    -45deg,
    #5f3af2c8 50%,
    #47cbff7e 50%
  );
  --vp-home-hero-image-filter: blur(76px);
}

.dark {
  --vp-custom-block-info: #cccccc;
  --vp-custom-block-info-bg: #474748;

  --vp-custom-block-tip: #009400;
  --vp-custom-block-tip-bg: #003100;

  --vp-custom-block-warning: #e6a700;
  --vp-custom-block-warning-bg: #4d3800;

  --vp-custom-block-danger: #e13238;
  --vp-custom-block-danger-bg: #4b1113;

  --vp-custom-block-note: #4cb3d4;
  --vp-custom-block-note-bg: #193c47;

  --vp-custom-block-important: #a371f7;
  --vp-custom-block-important-bg: #230555;

  --vp-c-brand-1: #9b85f5;
  --vp-c-brand-2: #7759f1;
  --vp-c-brand-3: #615ced;
}

/* 标题字体大小 */
.custom-block-title {
  font-size: 16px;
}

/* 注释容器:背景色、左侧 */
.custom-block.info {
  background-color: var(--vp-custom-block-info-bg);
  border-left: 5px solid var(--vp-custom-block-info);
}

/* 提示容器:边框色、背景色、左侧 */
.custom-block.tip {
  /* border-color: var(--vp-custom-block-tip); */
  background-color: var(--vp-custom-block-tip-bg);
  border-left: 5px solid var(--vp-custom-block-tip);
}

/* 警告容器:背景色、左侧 */
.custom-block.warning {
  background-color: var(--vp-custom-block-warning-bg);
  border-left: 5px solid var(--vp-custom-block-warning);
}

/* 危险容器:背景色、左侧 */
.custom-block.danger {
  background-color: var(--vp-custom-block-danger-bg);
  border-left: 5px solid var(--vp-custom-block-danger);
}

/* NOTE容器:背景色、左侧 */
.custom-block.note {
  background-color: var(--vp-custom-block-note-bg);
  border-left: 5px solid var(--vp-custom-block-note);
}

/* IMPORTANT容器:背景色、左侧 */
.custom-block.important {
  background-color: var(--vp-custom-block-important-bg);
  border-left: 5px solid var(--vp-custom-block-important);
}

/* CAUTION容器:背景色、左侧 */
.custom-block.caution {
  background-color: var(--vp-c-red-soft);
  border-left: 5px solid var(--vp-c-red-3);
}

/* 侧边栏 */
.group:has([role="button"]) .VPSidebarItem.level-0 .items {
  padding-left: 16px !important;
  border-radius: 2px;
  transition: background-color 0.25s;
}

/* 搜索框的位置 */
.VPNavBarSearch.search {
  justify-content: flex-end !important;
  padding-right: 32px !important;
}

.vp-doc blockquote {
  border-left: 4px solid var(--vp-c-divider);
}

/* .vitepress/theme/style/blur.css */
:root {
  /* 首页导航 */
  .VPNavBar {
    background-color: rgba(255, 255, 255, 0);
    backdrop-filter: blur(10px);
  }

  /* 文档页导航两侧 */
  .VPNavBar:not(.home) {
    background-color: rgba(255, 255, 255, 0);
    backdrop-filter: blur(10px);
  }

  @media (min-width: 960px) {
    /* 文档页导航两侧 */
    .VPNavBar:not(.home) {
      background-color: rgba(255, 255, 255, 0);
      backdrop-filter: blur(10px);
    }

    /* 首页下滑后导航两侧 */
    .VPNavBar:not(.has-sidebar):not(.home.top) {
      background-color: rgba(255, 255, 255, 0);
      backdrop-filter: blur(10px);
    }
  }

  @media (min-width: 960px) {
    /* 文档页导航中间 */
    .VPNavBar:not(.home.top) .content-body {
      background-color: rgba(255, 255, 255, 0);
      backdrop-filter: blur(10px);
    }

    /* 首页下滑后导航中间 */
    .VPNavBar:not(.has-sidebar):not(.home.top) .content-body {
      background-color: rgba(255, 255, 255, 0);
      backdrop-filter: blur(10px);
    }
  }

  /* 分割线 */

  @media (min-width: 960px) {
    /* 文档页分割线 */
    .VPNavBar:not(.home.top) .divider-line {
      background-color: rgba(255, 255, 255, 0);
      backdrop-filter: blur(10px);
    }

    /* 首页分割线 */
    .VPNavBar:not(.has-sidebar):not(.home.top) .divider {
      background-color: rgba(255, 255, 255, 0);
      backdrop-filter: blur(10px);
    }
  }

  /* 搜索框 VPNavBarSearchButton.vue */
  .DocSearch-Button {
    background-color: rgba(255, 255, 255, 0);
    backdrop-filter: blur(10px);
  }

  /* 移动端大纲栏 */
  .VPLocalNav {
    background-color: rgba(255, 255, 255, 0);
    backdrop-filter: blur(10px);
    /* 隐藏分割线 */
    /* border-bottom: 5px solid var(--vp-c-gutter); */
    border-bottom: 0px;
  }
}

/* .vitepress/theme/style/vp-code-group.css */

/* 代码块tab */
.vp-code-group .tabs {
  padding-top: 30px;
}

/* 代码块tab-顶部小圆点 */
.vp-code-group .tabs::before {
  background: #fc625d;
  border-radius: 50%;
  box-shadow: 20px 0 #fdbc40, 40px 0 #35cd4b;
  content: " ";
  height: 12px;
  width: 12px;
  left: 12px;
  margin-top: -15px;
  position: absolute;
}

/* 代码组 */
.vp-code-group {
  color: var(--vp-c-black-soft);
  border-radius: 8px;
  box-shadow: 0 10px 30px 0 rgb(0 0 0 / 40%);
}
六、丰富功能模块(插件篇)
为了扩展 vitepress 的功能社区提供了很多插件供我门选择, 根据我们的需求自行选择对应的插件
1. 添加评论插件
使用giscus来做vitepress 的评论模块,使用也非常的简单,具体可以参考:giscus 文档,首先安装giscus
$ pnpm add -D @giscus/vue$ npm install -D @giscus/vue打开giscus 文档,如下图所示,填入你的 github 用户名 + 仓库名,勾选你需要的配置
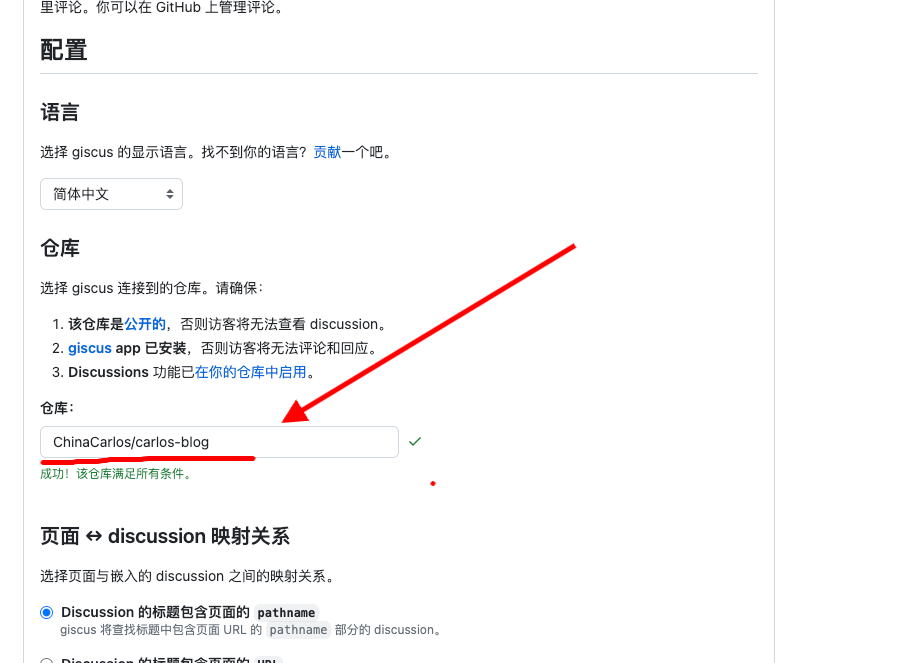
记住你的这几个参数 repo, repo-id, category, category-id, 后面添加评论组件需要用到
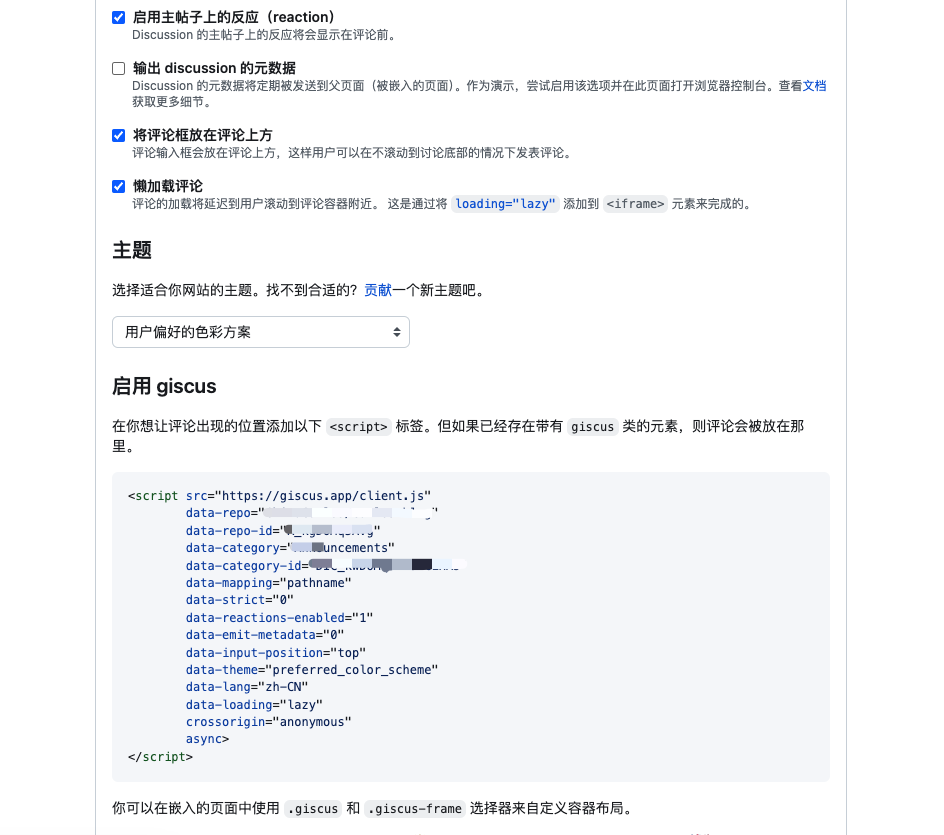
在.vitepress/theme/目录下创建Layout.vue组件,添加 giscus 评论组件,在.vitepress/config.mts配置文件中使用自定义布局。
<template>
  <Layout>
    <template #doc-footer-before> </template>
    <template #doc-after>
      <div style="margin-top: 24px">
        <Giscus
          :key="page.filePath"
          repo="*"
          repo-id="*"
          category="*"
          category-id="*"
          mapping="pathname"
          strict="0"
          reactions-enabled="1"
          emit-metadata="0"
          input-position="bottom"
          lang="zh-CN"
          crossorigin="anonymous"
          :theme="isDark ? 'dark' : 'light'"
        />
      </div>
    </template>
  </Layout>
</template>

<script lang="ts" setup>
import Giscus from "@giscus/vue";
import DefaultTheme from "vitepress/theme";
import { watch } from "vue";
import { inBrowser, useData } from "vitepress";

const { isDark, page } = useData();

const { Layout } = DefaultTheme;

watch(isDark, (dark) => {
  if (!inBrowser) return;

  const iframe = document
    .querySelector("giscus-widget")
    ?.shadowRoot?.querySelector("iframe");

  iframe?.contentWindow?.postMessage(
    { giscus: { setConfig: { theme: dark ? "dark" : "light" } } },
    "https://giscus.app"
  );
});
</script>...
import Layout from "./Layout.vue";
...
export default {
...
Layout: () => {
return h(Layout, null, {
// https://vitepress.dev/guide/extending-default-theme#layout-slots
});
}
...
}添加之后效果如下: 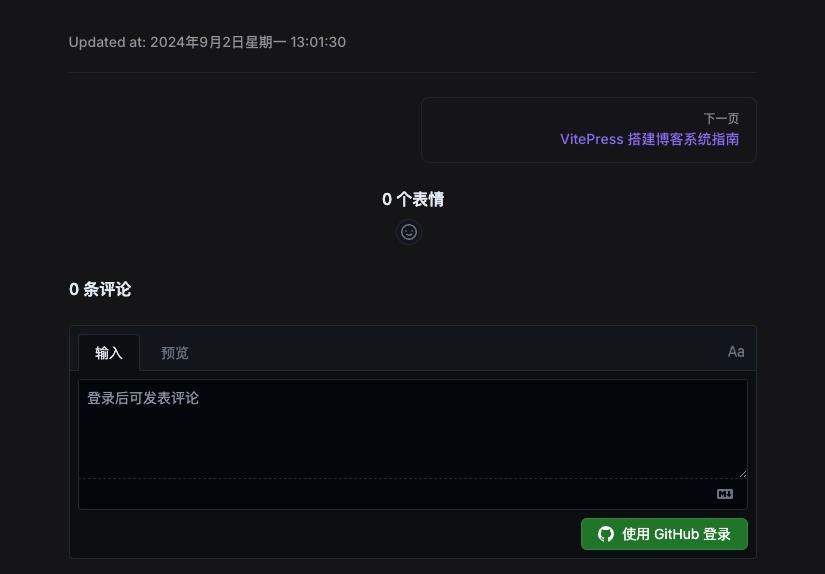
2. 首页添加五彩纸屑插件
$ pnpm add canvas-confetti创建组件.vitepress/theme/components/confetti.vue,在首页index.md中引入,需要在.vitepress/theme/index.ts注入该 Vue 组件
<script setup lang="ts">
import confetti from "canvas-confetti";
import { inBrowser } from "vitepress";

if (inBrowser) {
  /* 纸屑 */
  confetti({
    particleCount: 100,
    spread: 170,
    origin: { y: 0.6 },
  });
}
</script>...
import confetti from "./components/confetti.vue";
...
enhanceApp(ctx) {
const { app } = ctx;
app.component("confetti", confetti);
},
...<!-- 添加到md文章末尾 -->
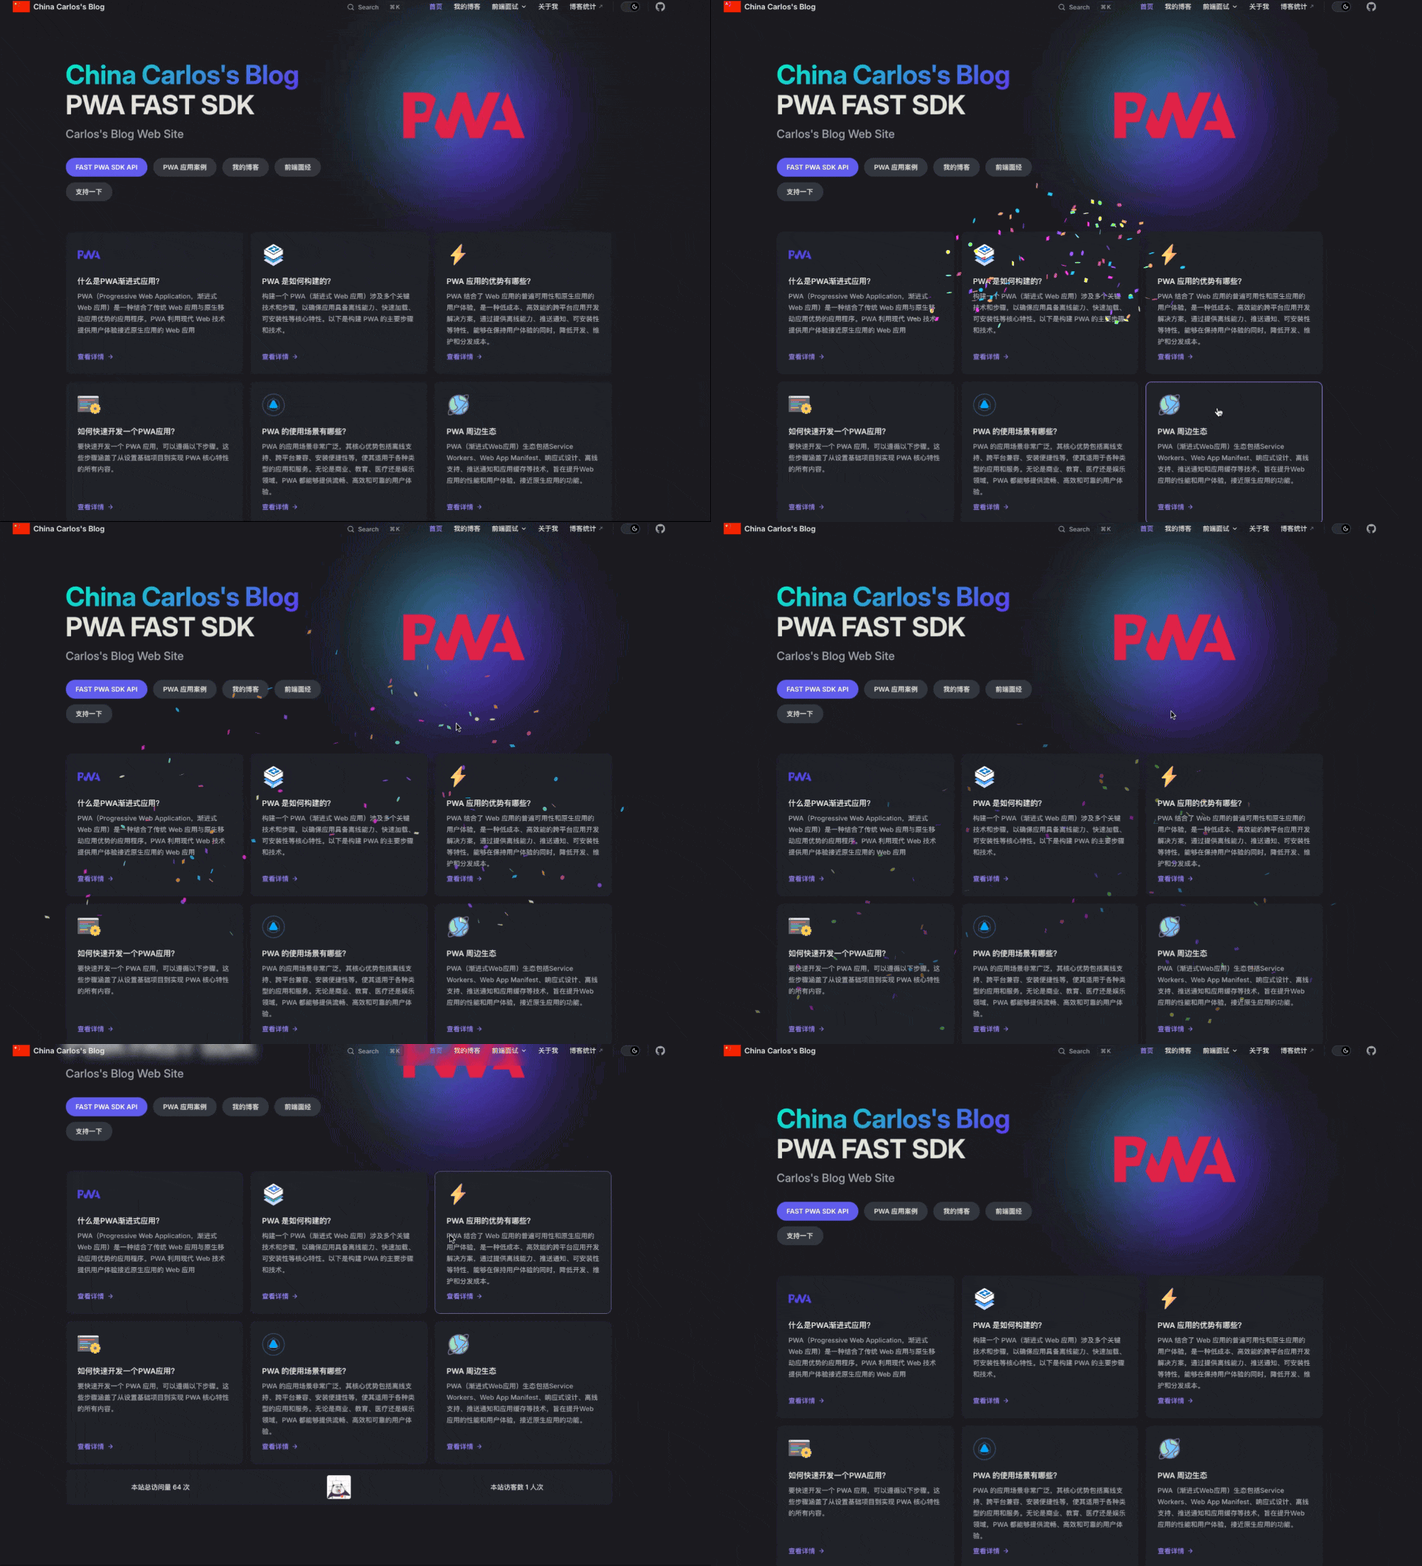
<confetti />添加之后的首页效果图:
3. 首页添加访客统计插件 busuanzi
$ pnpm add busuanzi.pure.js...
import busuanzi from "busuanzi.pure.js";
import VisitorPanel from "./components/VisitorPanel.vue";
...
enhanceApp(ctx) {
const { app, router, siteData } = ctx;
...
app.component("VisitorPanel", VisitorPanel);
if (inBrowser) {
router.onAfterRouteChanged = () => {
busuanzi.fetch();
};
}
},<template>
<div class="panel">
<div class="container">
<section class="grid">
<span class="text">
本站总访问量
<span id="busuanzi_value_site_pv" class="font-bold">--</span> 次
</span>
<img
src="/heart.gif"
alt="heart"
class="heart-img"
width="50"
height="50"
@click="onLinkUmiHandle"
/>
<span class="text">
本站访客数
<span id="busuanzi_value_site_uv" class="font-bold">--</span> 人次
</span>
</section>
</div>
</div>
</template>
<script setup lang="ts">
import { inBrowser } from "vitepress";
const onLinkUmiHandle = () => {
if (inBrowser) {
window.open(
"https://us.umami.is/share/Y2BYxCAm7R0DG2Xi/carlosme.fun",
"_blank"
);
}
};
</script>
<style scoped>
.panel {
margin-top: 12px;
margin-bottom: 8px;
}
.container {
background-color: var(--vp-c-bg-soft);
border-radius: 8px;
width: 100%;
min-height: 32px;
max-width: 1152px;
margin-left: auto;
margin-right: auto;
}
.heart-img {
border-radius: 4px;
cursor: pointer;
}
.grid {
font-weight: 500;
padding-top: 12px;
padding-bottom: 12px;
padding-left: 12px;
padding-right: 12px;
justify-items: center;
align-items: center;
grid-template-columns: repeat(3, minmax(0, 1fr));
display: grid;
}
.text {
font-size: 0.875rem;
line-height: 1.25rem;
}
</style><!-- 添加到md文章末尾 -->
<VisitorPanel />安装完之后效果图:

4. 其他实用插件
TIP
其他的插件我就不一一列举了,无脑参考对应的文档安装就可以了
sandpack 插件,实时编码
itepress-plugin-sandpackhttps://vitepress-sandbox.js-bridge.com/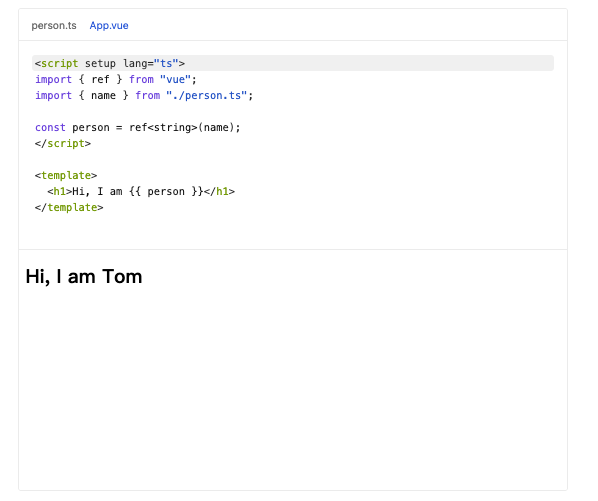
Vue 组件预览插件
@vitepress-code-previewhttps://welives.github.io/vitepress-code-preview/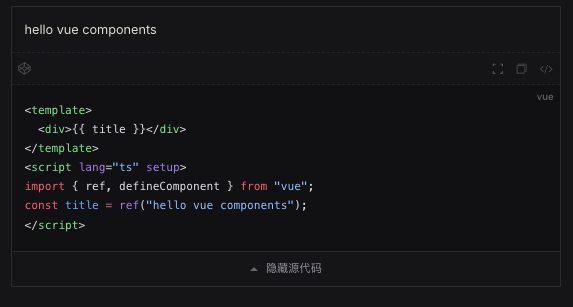
根据目录自定生成侧边栏插件
vitepress-sidebarhttps://vitepress-sidebar.cdget.com/页面加载进度插件
vitepress-plugin-nprogresshttps://github.com/ZhongxuYang/vitepress-plugin-nprogress文件图标插件
vitepress-plugin-group-iconshttps://vp.yuy1n.io/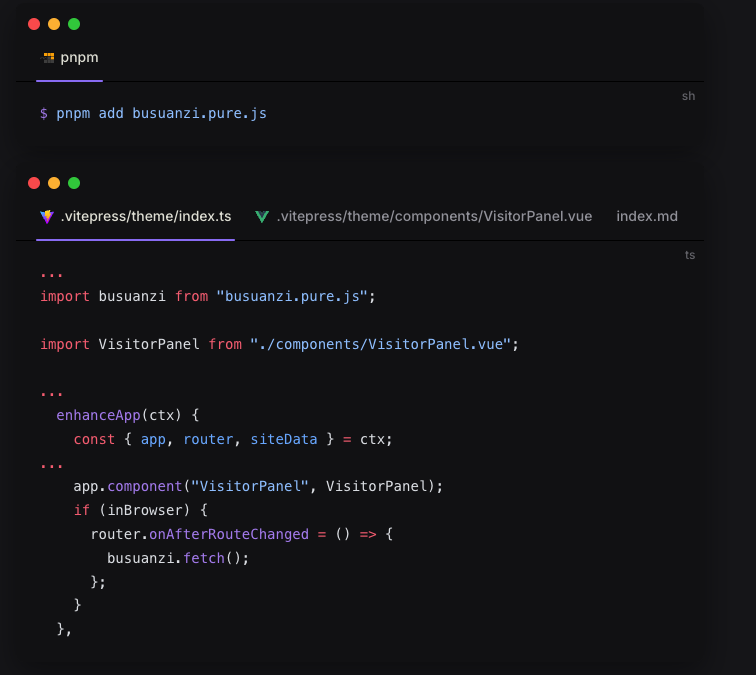
博客访问流量统计分析工具
https://umami.is/图片放大查看
medium-zoomhttps://github.com/vuejs/vitepress/issues/854
在 .vitepress/theme/index.ts 添加如下代码,并保存
import DefaultTheme from "vitepress/theme";
import mediumZoom from "medium-zoom";
import { onMounted, watch, nextTick } from "vue";
import { useRoute } from "vitepress";

export default {
  extends: DefaultTheme,

  setup() {
    const route = useRoute();
    const initZoom = () => {
      // mediumZoom('[data-zoomable]', { background: 'var(--vp-c-bg)' }); // 默认
      mediumZoom(".main img", { background: "var(--vp-c-bg)" }); // 不显式添加{data-zoomable}的情况下为所有图像启用此功能
    };
    onMounted(() => {
      initZoom();
    });
    watch(
      () => route.path,
      () => nextTick(() => initZoom())
    );
  },
};/* 重置样式 */
.medium-zoom-overlay {
z-index: 30;
}
.medium-zoom-image {
z-index: 9999 !important;
}